Wednesday, May 20, 2015

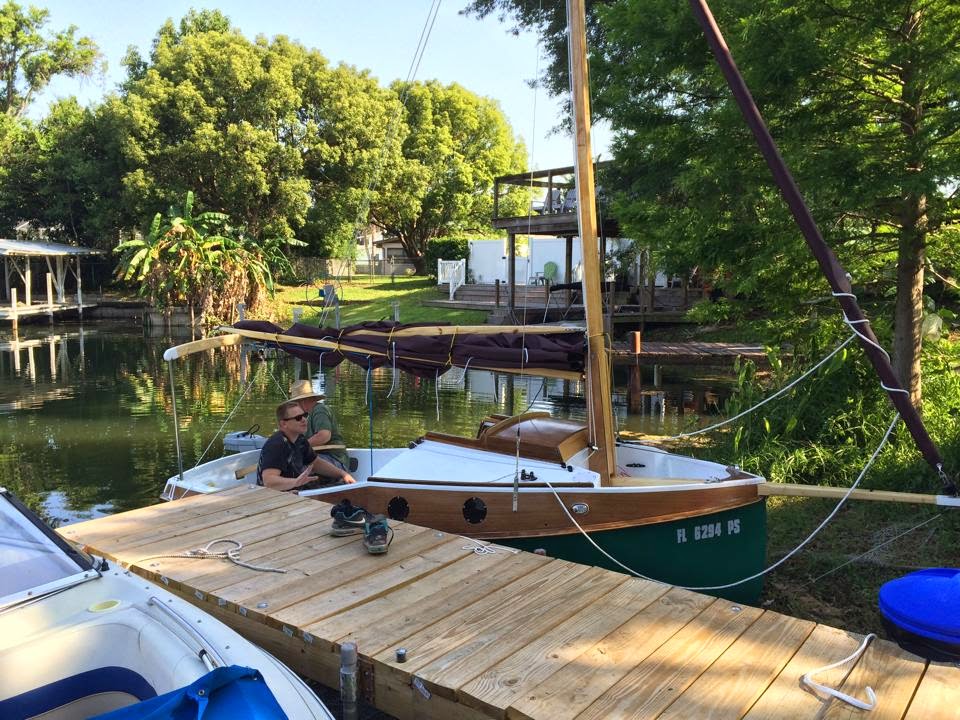
PocketShip in the Florida 120


Last week my PocketShip participated in the Florida 120. This year was grueling and out of the 49 boats registered for the event only 4 made the entire trip. I'm happy to say my PocketShip was one of them. My crew and myself are battered and bruised and my boat has a couple of battle scars. But the worst of it was a slightly cracked rub rail. This event tested PocketShip with many different sailing conditions. 


 The first day was 11 hours of bob and bake beating against minimal winds and being happy to reach 3kts. We spent 12 hours covering the 35 miles.


The second day was a blast running with the waves in 12 kt winds and having perfect conditions to do a little surfing. The GPS hit 7kts on many occasions. We made the 40 miles that day in just over 5 hours.

The third day is a 15 mile trek across Pensacola bay. That morning the crew and I had a discussion on if we should stay at anchor or try to finish. We decided to press on. The winds were forecast for 15-20kts so we set out with a reef in the sail. As we started to cross the bay we were greeted by confused seas that required an active hand on the tiller to keep from being spun around. We buried the bowsprit once and a couple of times we were knocked down so far that the portholes were partially submerged. We made it in about 4 hours of the scariest sailing I've ever done. This is where a majority of the fleet gave up. We arrived at the 3rd nights anchorage with just 11 other boats. Most of those chose to bail out at a marina 3 miles north rather than trying to recross the bay.

The next day the forecast for the bay seemed better and it was. Fine easy sailing in stark contrast to the day before. 

PocketShip sailed well and showed how rugged she is. You do start to wonder about all those fillets when the seas become like a washing machine. My hats off to the designer and a call out to the only other home built to finish the event, a Bolger micro named 'Pete'.

Monday, January 26, 2015

Some things to fix up.

Mrs TaTas has been splashed and sailing now for six month or so.  The florida sun really takes it toll on boats.  Production boats seem to always be in a state of chalky gel-coat and silvery looking teak.

Mrs TaTas has been no exception to this rule.  Several things needed attention after the first season of sailing.  Most (if not all) was due to oversights I made during construction.  Some of them have been mentioned before.

1.  The most obvious sun damage was that of the rub-rails.  It seemed that in some places I sanded too aggressively and removed too much epoxy.  The clear coat in these areas turned yellow and peeled off revealing the unfinished black walnut.  Black walnut has a very open grain and mold quickly moved in.  Didn't really do in long term harm but it looked pretty bad.


Although I don't have the after pictures it was a very easy 2 day job to sand the rub rails.  Apply a couple of coats of epoxy and then do a LIGHT sanding and reapply the WR-LPU clear coat.  They look as good as new and have held up for 2 months now.

2.  Had a similar situation with the breast hook.  You can see where I got a little agressive with the sander and got through the epoxy.


The solution was as easy as the rub rails.  Sand, re-expoxy, sand lightly and repaint.  Good as new.

3.  This one was the scariest and most disturbing of the problems.  During construction the backrests as they were cut from the factory did not fit.  They were about 1" too short to meet the forward bulkhead when fitting correctly aft.  I decided to butt-joint a couple of inches of wood along the front and then cut to size to make up the inch.  I did this butt joint with a slurry of epoxy and biaxial tape on the inside of the backrest.  After exposure to the sun the butt joint partially separated.  This may have been made worse because of the expanding foam I installed behind the backrest.  I've got a lot of theories but my leading one is that the foam retains heat as it shrunk it pulled the backrest in separating it at the butt joint.


At first I tried to pull it back out into position, but the foam behind it was acting like a glue and it wouldn't budge.  I got out my handy little dremel tool and cut a wide "V" down the center of the crack.  Again I tested it and satisfied myself that it was stable, just misaligned.  I filled the "V" with thickened epoxy and then placed another layer of biaxial tape over the crack.


I sanded that smooth and then applied fairing compound.


 I blended the faring compound with a sanding block until every looked (and felt) even.


After that it was a simple mater to prime and paint.  Although not invisible most people can't detected the repair unless told where it was.  I think it will disappear totally when the entire cockpit it next painted.

4.  In addition to the above I fixed the spray hood separation that occurred on the first splash and was documented in a prior post.  This was because of my improper masking and painting that didn't leave a non-painted areas for the epoxy to adhere to.  This happened only on the starboard side, as the install was solid on the front and port side.

To remedy I carefully put wedges between the deck and the splash hood on the starboard side.  This allowed me the room to chisel out the old epoxy.  After that I masked the area and used 80 grit sandpaper glued to the edge of a scraper to remove the paint.  I then applied some thickened epoxy.  Before that could set up I pulled the wedges out and, using the original construction screw holes, I screwed up from under the deck to close the glue joint.  After it set up I removed the temporary screws.  Been walking on it ever since without any indication of a problem.

5.  Finished the installation of the running lights.  Installed waterproof through hulls, pulled the wire and installed the power panel and main switch.  The running light needed wooden shims to ensure they were in parallel pointing forward.  I have a 80AH group 24 AGM battery that runs those lights and a interior curtesy light.  All are LED and the power draw is minimal to be almost non-existent.  I also have installed a couple of 12VDC outlets to power anything else I might want.  I want the electronics to stay minimal.

6.  Added 50 lbs more ballast in the forward floorboard hatch.  I have a total of 225 lbs of ballast and not more room in that compartment.


Thursday, September 11, 2014

Planning for the Future

My PocketShip has been complete now for a few months.  She's still sitting at the dock at my sons house.  I've only had the opportunity to sail her about 4 times since she was splashed.  The weather here in FL has just been too hot to have any fun in at all and the winds have been light with the typical central florida pattern of afternoon storms.

Three weeks ago I had surgery on my left shoulder and that will limit me for a little while.  My future plans with my PocketShip is limited to sailing in the Florida 120 next may.  I plan to do many short excursions for shaking out all of the system of the boat before I attempt that event.

There are many things I haven't tried yet with reefing being the main one.  I have to purchase the blocks and lines and other misc hardware to complete this project and I would like sail in some adverse conditions so that I can work out the kinks.

The same goes with anchoring.  I have all the gear all set up but as yet haven't tried to use it.  In addition right now I only have a bow anchor.  I will purchase an anchor for the stern.

The electrical still requires charging from the shore.  I also need to purchase a small solar charger to set up on my companion way hatch cover.

These are all minor things and as far as getting them set up on the boat it I estimate that it will take about 1 day.  I wish my shoulder would be ready that quickly.

Bill

Wednesday, June 18, 2014

Build Retrospective

First off I would like to say that the PocketShip is a wonderful boat.  I think one of the best examples of a pocket cruiser in the 15' range that exists today.  It sails nicely and looks stunning.  Everything has a functionality that is very well thought out.  Design wise I can't think of any misses.

The build itself is much longer (at least in my case) than the estimated 500 hours.  My 1 to 1 1/2 year build turned into 3 1/2 years.  I tried to go with high quality sails, hardware and accessories on every part of this boat.  When in doubt I overbuilt.  The final cost of the boat is much more than I would have paid for a similar factory built boat.  However, I feel that the quality is a cut above anything you could buy commercially and I am intimately familiar with every nook and cranny.  That knowledge is important when sailing.

Mistakes:

  1. Bulkhead number two was canted about 1/2" athwart.  It was the largest mistake on the boat but doesn't amount to anything.
  2. Technically not a mistake (since I did it on purpose) the hatch cover is a little skewed to make up for item number 1.
  3. When I marked hull for painting I masked for where the hatch cover contacted the hull so that I could get a good epoxy bond when I glued the hatch cover on.  Well, on the starboard side I simply missed.  I thought there was enough non-painted hull area that I could get a good epoxy adhesion.  I was wrong and the first sail when my son stepped on that area it let loose with a sickening crack.  There was no damage but there is a small gap there now.  I'm going to have to carefully excavate the paint from under that area and re-glue it properly.  For now it doesn't cause any problems.
  4. Even though I own a drill press there were many times that I missed getting the holes correct on the tabernacle, bowsprit, mast, boom and gaff.  They either had to be plugged and redone or bored out to make them fit.
  5. I think the hull painting would have turned out better if I had simply "rolled and tipped" it vs using a HVLP sprayer.
  6. The bright work got two coats of clear WR-LPU paint.  I think it could have used a third coat.
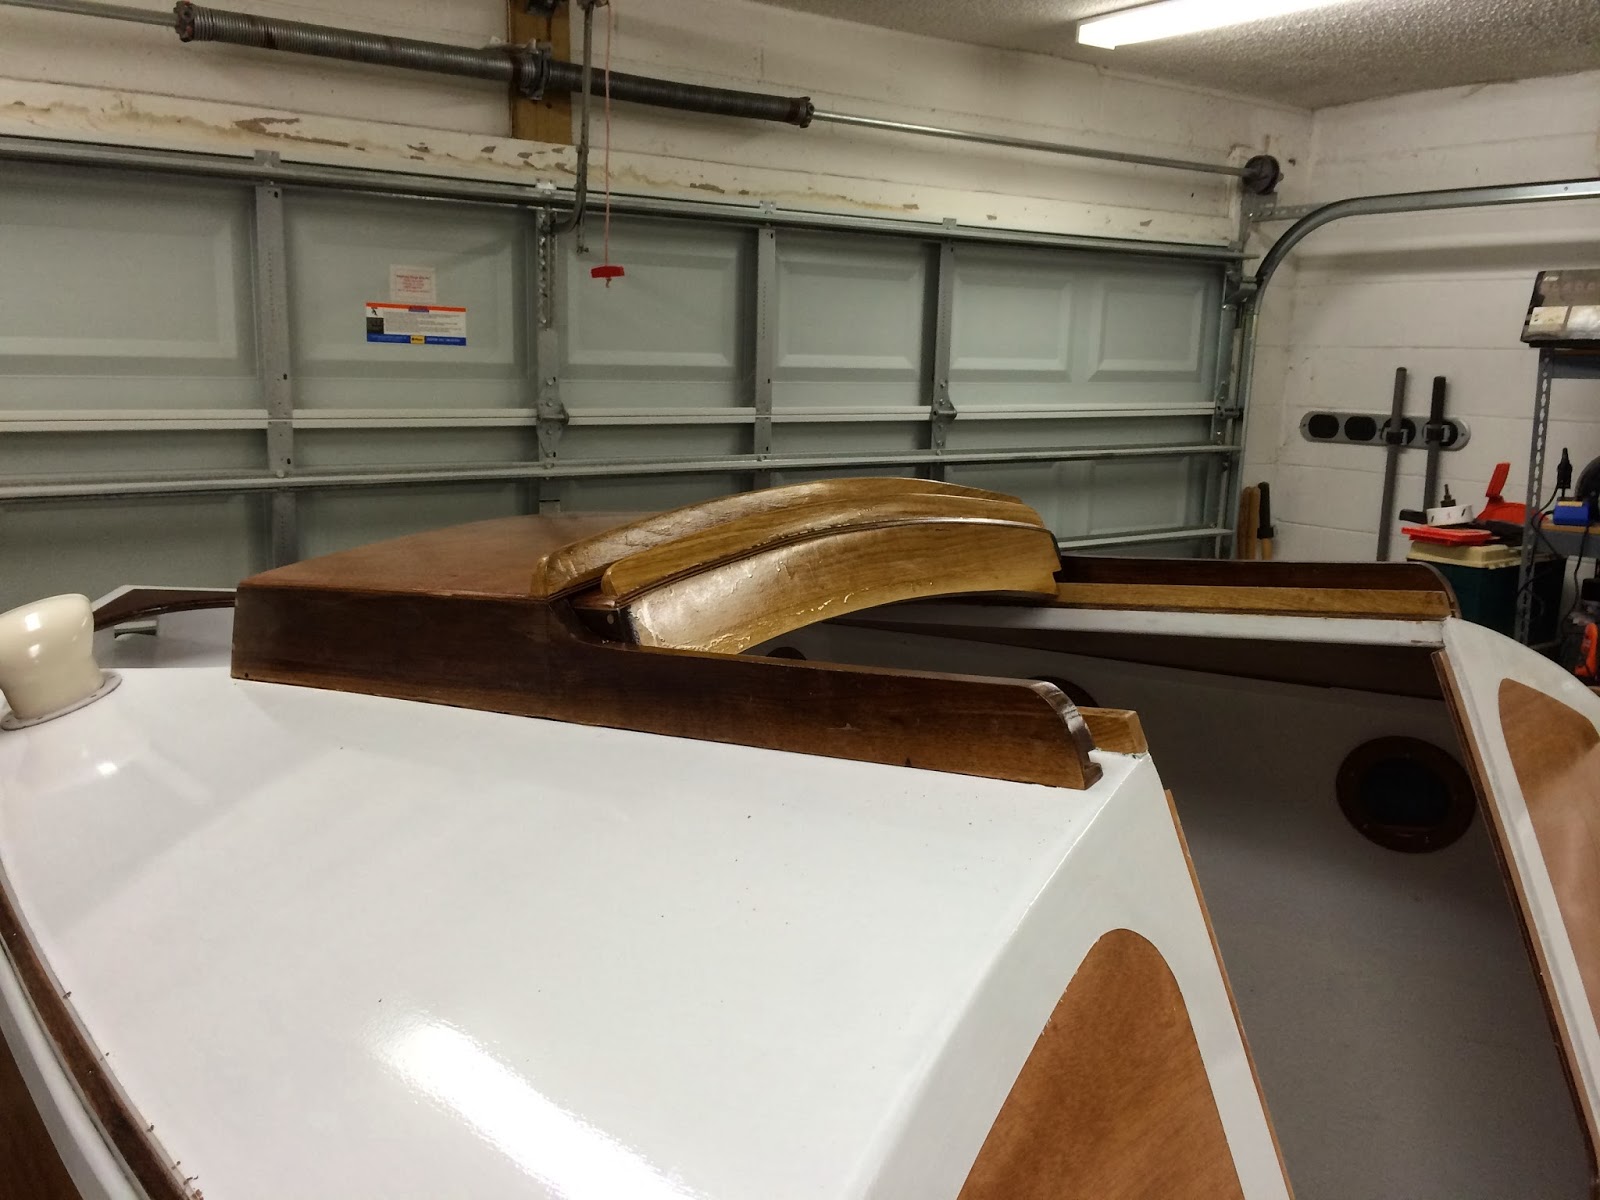
  7. In several placed where I have bright work that was encapsulated in epoxy I sanded too aggressively and removed too much epoxy and got into bare wood.  Sometimes it's hard to see those places before you paint.  When clear coated they become very obvious and didn't result in the finish that I was trying to achieve.  After the fact I learned that a rag with alcohol will reveal those areas instantly.
So, would I start another one tomorrow.  That's a resounding NO.  I've scratched the itch to build a cruising sailboat.  I am helping my wife and daughter with kayak builds.  They are building a Chesapeake 17 and a Petral SG respectively.  I am providing technical support and that suits me just fine.


The PocketShip was the third boat I had built.  Each of them was a stitch and glue boat and each one was better than the one before.  Ten years ago I build my second boat, a small sailing skiff that my son uses weekly either for sailing or fishing.


I will probably build another (smaller) boat again someday.  For now I will just relax and learn to be a great PocketShip sailor.

Build is over sailing adventures will continue to be documented here!

Tuesday, June 10, 2014

Canvas and Sail Cover Update

I decided against getting the bimini but did order a companion way cover, sail cover, and cockpit cushions.  I didn't contract the canvas guy to do the sacrificial cover for the jib.  I found a local sail loft that did that work (but I haven't picked the sail up yet).  The canvas guy hadn't done that kind of work before so I thought I would take it to a pro.

Here is the short list of items that I have left to do.

  1. Set up the anchor and rode.
  2. Buy a battery (agm).
  3. Finish the electrical wiring
  4. Install the cabin light
  5. Buy and install solar charger
I didn't want to run wires back to the transom so I purchased a Navisafe tri-color that will operate as my rear navigation light.  I need to purchase a mount for this with the idea of putting on the boom support upright.

Friday, May 30, 2014

Ordering up some canvas

Not wanting to have to take the sails off and on each time I go out I've decided it's time to get some canvas made for my PocketShip.  This is the ordered short list of what I'm having a custom canvas guy estimate for me.

1.  Main Sail Cover.
2.  Sacrificial Furling Jib Cover.
3.  Cockpit Cushions.
4.  Bimini.

I'm totally sold on the first two and will probably order them up unless they're just way too expensive.  I'm in for the cockpit cushions too if the price is right.  The guy said he wouldn't have a problem doing a small bimini that sat between the bridle and the mainsheet just under the boom.  I'm not sure I want to mount that to my boat and having all that extra hardware seems like it would really get in the way.  That being said, this is Florida and in the summer time any amount of shade is a blessing.

Thursday, May 22, 2014

Maiden Voyage

At the dock after the christening ceremony.  Getting ready to leave with Gilligan (Scott in the sunglasses).


Backing it out

Turning it around.


We're off down the canal and into Little Lake Conway.


The rest is eye candy sailing pics.


Wednesday, May 21, 2014

Got the Sails Up.

Got off work yesterday and went over to my sons house and worked on rigging the sails.  We had quite a few misfires on where to run the lines and sheets but and it took about 2 hour for me and my two sons to get it straightened out.  The maiden sail will have to wait till thursday as we ran out of sunlight.

At this point I'm got to record the last of the time that it took me to build this boat.  I have some small things that I WANT to finish but nothing that's going to keep me from using it for its intended purpose.  Here are the final hours.

Hours this session: 6
Hours total: 673


Sunday, May 18, 2014

SPLASH!!!

This morning I took the boat over the Little Lake Conroy and put it in at the boat ramp off of Hoffner ave. behind the church.  The ramp was very crowded and busy but my son, Sean is experience with this and was there to help me.  After getting the boat prepped we waited in line to get the boat in the water.  Finally it was our turn.  We backed the boat as far as we dared but couldn't get it to float off.  We eventually had to get in the water and push it off.  This exposed the need for a tongue extension for the trailer.  I had ordered one when I got the trailer but they had forgotten to put it on.  I'll taking the trailer back for that work on friday.


The boat ramp is about 3 miles across the lake from where my Seans' dock is located.  He has a home on one of the many canals that provide access to the lake.  My other son Scott and I set off across the lake using the Torqueedo outboard.

I didn't have the mast up and left the sails on shore with the mission to just get the boat over to Seans' dock so I could do the running rigging there.  I did drop the centerboard and that worked just fine.


I kept the throttle eased back since I didn't know how much distance I could get out of the Torqueedo.  Once we got to the other side of the lake Scott had problems identifying which of the 3 canals in the same general area was the one that would take us to Seans' dock.  I called Sean and he rowed out in the last boat I built and flagged us in.  By the time we got to the dock the Torqueedo was down to 52%.


I beached the bow of the boat on the left hand side of Seans' dock and tied it up.  Sean had brought the car and trailer around to his house after he dropped us off.  We did a little cleanup and I left her in Seans' back yard.  A previous commitment to go visit my mother in law kept me from getting the mast and sails up and having a nice sail around the lake.  I'm going to try to get out and do that on tuesday evening after work.  At that time we'll have the christening ceremony and first sail.


Wednesday, May 14, 2014

Boat on Trailer

Been getting all the little things done on the boat in preparation for launch day.  Managed to get the boat on the trailer without too much damage (just a couple of scuffs and a small dent).  Nothing that can't be easily fixed.  Should've paid more attention while getting it on the trailer.  I hate having to re-do work 'cause I rushed or didn't pay as much attention to something as I should have.  Thanks for the help from Rob, Mike and my son Sean.


The boat does look beautiful.  I've got the mast on now and shrouds have been mounted.  I purchased the "Pocketship Sailing Hardware Kit" from clc.  The shrouds ended up being just the right length for my mast.  I guess that means I got all the dimensions correct.


The trailer is an aluminum Magic Tilt that was purchased from a local dealer.  They set it up as best they could from the dimensions I gave them.  The bunk supports are a little long.  Gonna borrow my sons saws-all and take care of that tomorrow.  The only option that I added was the spare tire.  It's a nice trailer and the out the door price + TTL was a shade over $2100 new.  On a related note I was able to get the boat registered (although it threw the local DMV into all kinds of convulsions and took about 2 hours and lots of phone calls) and was able to obtains reasonable insurance through BoatUS.


Since this picture I've remounted the removable tabernacle, and boom support and mounted the mast.  I also loaded on the 150lbs of extra ballast and mounted the running lights.  Measuring the current height of the trailer and comparing it to the garage door height I have a scant 2" of clearance but should still be able to put it in my garage should I need to.


I finished adding the drop boards while it was in the garage.  They fit pretty well right out of the box.  I had to shave just a little off the outboard edges of the curved top of the top board to get clearance for the sliding hatch.  After I did that it fit perfect.

Also note the compass.  I really like it in this position but I can't take credit for it.  I saw it on someones blog I just haven't been able to find it again to give them attribution.

Interestingly last night we had one of those severe Florida thunder storms that drops torrents of rain in a small amount of time.  This morning I went to see where I was leaking.  I checked inside the lazarettes, not a drop.  Checked the cabin interior, again dry as a bone as was the dorades.  Pretty nice.


I added a swivel cleat to the base of the mainsheet block.  Others have done this and manual tells you that small boats should never have the mainsheet cleated.  However, my rule of thumb is that you should always have the mainsheet in hand.

I've still got some running rigging tasks to complete.  The plan is to splash it this weekend if the weather cooperates.

Thursday, February 27, 2014

Fitting Out. Part 2.

Last I left off I was adding all the fitting out parts for the PocketShip.  It's amazing how time consuming this is.  Seems like there is an endless list of little things to do once you've got the hull built.  On another note, my sails from CLC arrived last week.  They subcontract those out to a sailmaker whose name I've lost.  Anyway he did a very nice job.


The companion way hood was very tricky to get perfectly aligned on the boat.  I should have marked it better when I was laying it out.  The hatch slides easily but not so easily that it will move around in rough seas.


I really like the way it turned out with the black walnut.


Another shot with it open.


In the front I used white oak for contrast.  I like the way that turned out too.


Nice shot of the rudder with the hardware attached.  Pretty wood.


This is the drop board slides (again black oak) with some trim rings that I used around the vent inlet.  Between each interior vent hold and trim ring I captured a butterfly vent control.  This makes it easy to adjust the amount of air flow into the cabin and it looks nice.  No picture so you'll just have to use your imagination!


Here are the drop board slides installed.  I love that dark wood.


I made up about a dozen of these little guys for  epoxy and (later) painting/varnishing the spars.  They are very handy and keep the after drying touch ups to a minimum.  Not my idea, I saw this on Offcenter Harbor.  Geoff Kerr, the builder of the PocketShip prototype, is a frequent contributor there.  He has a multipart video on building a Caledonia Yawl that is a very good reference to small boat building with epoxy.


If you look at this pile of wood you see the mast, boom, boom gallows, tiller and bow sprit.  These have all had their sealing coats of epoxy and await touch-up sanding and painting.


The "Hull Hardware Package that I purchased from CLC appears to have been shipped without the properly sized lexan drop boards.  In the picture above the template is underneath and notice that the lexan is too small to cover the template (both pieces of lexan are the same size).


Note in this picture the lexan is exactly the same size as the template.  I've asked if this is right on PocketShip.net.  Maybe it's just a mistake and not the way it's supposed to be.

Hours this session: 16
Hours total: 667

Friday, January 17, 2014

Fitting Out. Part 1.

Over the past few weeks I've been working on getting some of the hardware on the boat.  I purchased the "Hull Hardware Package" from CLC so I've been working mostly on getting the stuff that they provided me installed on my hull.  The majority of my time has been spent getting screws and bolts cut down and then marking the location of them.  I'm pretty careful about making sure I've got things exactly where they need to be before putting a drill bit to the boat.


Here you can see the eyebolts for the rudder.  Installation on this went smoothly.  Installed just like the manual instructs.


In this picture you can see the bushing for the centerboard pendant.  This was a little of a problem and outlined a shortcoming/mistake in the construction manual from CLC.  If you're interested you can find the explanation at the Pocketship Forum.  If you look down at the lower corners of the photo you can see the access hatches for the lazarettes.


The dorade vents went in easy.


The anchor fairleads are held to the rail with 1 1/2 wood screws.


The most time consuming task was installing the portlight lenses.


I chose to differ from the manual in that I used the decorative washers and chose not to countersink the screw heads.  This eliminated the worry of cracking the acrylic lens during tightening.  Instead of using marine calking compound to bed the lenses I chose to use butyl tape as a bedding compound.  It's easily shapable with your hands and stays where you put it.  The dark edge around the portlight above is the butyl tape.  The uneven edges are the squeeze out.  This was easy to clean up by running a plastic knife around the inside and simply pulling off the squeeze out.


I clear painted and mounted the companion way hatch and its spray cover.  I chose to epoxy mine down.  All the planning on it must have been right.  It slides easily and without any play.


Attached the two cleats and drilled holes for the boom gallows.  I still need to line these with epoxy to prevent rot.


The mount for the boom gallows was an awkward install.  Hard to get in there and drill.  I used a dremel tool with a shaft extension to create the holes.  Used the same tool to cut off the outboard edge of the support.  You can see the squeeze out of the butyl tape that I used for bedding.  Aside from the U-Bolt on the front which I used 5200 on, the rest of the bedding has been done with butyl tape.  It's just way too easy to use and it also make future maintenance and cleanup much easier.


Here you can see my nifty outboard mount.  Pull the cotter pin on the center leg and the hold thing lifts off easily leaving behind only the three small mounting brackets.  I still need to fabricate a wooded plate to bolt to it.

I've ordered the sails and the "Sailing Hardware Package" from CLC (that was a fast 3K).  I'm getting close enough now to smell the ocean.  Need to build the mast, gaff, boom, and bowsprit, take care of the electrical, buy a trailer and I'll be on the water!

Hours this session: 12
Hours total: 651